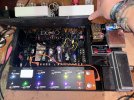
Uh...has anyone else started out like this?

jjtguitar

Well-Known Member
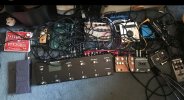
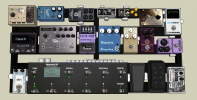
Just got myself a second hand PBC10 after years of dreaming and planning. Couldn't wait/afford the parts for the cables I'll build to set it up properly, but also couldn't wait to try out my new toy...

I'm curious, has anyone else with a PBC10 created a Frankenstein rig out of whatever cables they can lay their hands on just to start making glorious noise as soon as possible?
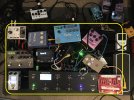
PBC ver 0.1 top - Copy.jpg

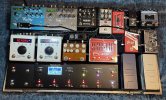
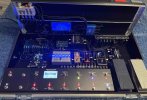
Pedals in loops of the PBC10 are inside the yellow box (NOT including the Keeley Super Phat Mod, Tuner or volume pedal. The main area of chaos is the "pile of drives". Here is another angle...
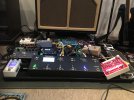
PBC ver 0.1 front.JPG

Signal flow is as follows:
Guitar into PBC10
Loop 1: POG2
Loop 2: Xotic SP Compressor
Loop 3: Decibelics Golden Horse
Loop 4: Analogman Prince of Tone
Loop 5: Lovepedal Eternity Kanji
Loop 6: Mesa Throttle Box
Out 5-6: to Kingsley Squire Preamp
In 7-10: from Kingsley Squire Preamp
Loop 7: Strymon DIG (stereo, parallel)
Loop 8: Strymon BigSky (stereo, parallel)
Loop 9: Strymon Timeline (stereo, parallel)
Loop 10: Neunaber Illumine (stereo, parallel)
Out L/R: to GFI Cabzeus

PBC is sending MIDI to Selah Quartz timer, Timeline, BigSky and Illumine
Selah Quartz is sending tempo info to the Timeline and DIG.

I'm currently testing this in my studio straight into my DAW (Reason or Ableton Live) using studio monitors or IEM. It may be a mess, but it sounds awesome.

Currently doing A/B tests between the Squire/Cabzeus pairing and a DSM Humboldt Simplifier (which can be seen in the top of the first pic) to try and work out which I like better.

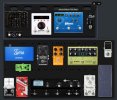
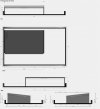
It is currently setup on a Pedaltrain Pro board, but that is only a temporary solution as it won't be large enough for what I'm planning in the long run. My initial plan for the PT-Pro is below (mocked up in SketchUp).
PT-Pro PBC Ampless 1.png
This plan quickly unraveled for the following reasons:
1. I didn't have plugs and cables to build everything "properly", only a varied assortment of patch leads The length of these patch leads led to the "Pile of Drives" and also the rearrangement of the Illumine and Timeline.
2. The Supro Trem was in loop 7 but I didn't have the correct cables to put a mono input/output pedal into a stereo loop, and it did NOT cope with the high output of the Squire preamp.
3. After hearing how awesome the Illumine and Timeline were in parallel, I decided I simply must find out how good a BigSky and DIG sound in parallel. At the same time as the Timeline and Illumine. So the trem and dimension had to make way. And it sounds GLORIOUS.
4. I swapped out the Octopus analog octave for the POG2, and was reminded how good it sounded.

I do have to give a big plus to the Neunaber Illumine, as it has TRS input and output! So I could use some TRS patch leads I had lying around for that pedal, didn't need an insert cable. Very impressed, hope it gets added to the device list soon!

So where to from here? I've ordered a dual external footswitch for page up/down duties, which will go between the PBC and the Quartz. I'm also getting six patch leads so I'll be able to hopefully get the pile of drives into some semblance of order. Or at least three pedals. I'm hoping I can get it at least a little neater so I feel I can take it out in public without people recoiling in horror.

I'm planning to swap the DIG for a Free the Tone Future Factory. If the DIG had MIDI and presets, it would stay, but alas it does not. I'm also planning on modding the POG2 for MIDI. I will probably consider a GFI Synesthesia to handle modulation duties in Loop 6 and bump the Golden Horse to always on buffer (which I have been using it for). And maybe a MIDI controlled drive...
 
I think it's good to start out that way, as long as you don't need to bring it anywhere. That way, you can easily change things and figure out your device list and routing. Then, once you have things decided, you can start making it neat. Many people, myself included, have started with a nice cleanly wired board only to start changing things which inevitably ends up making the board look worse.
 
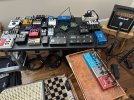
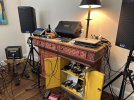
Im starting off worse than you guys. Not even close to mounting anything because I keep starting over with the programming. Don’t even have enough room in the studio so had to move to another room where I’ve got my solo rig set up. The wife allowed me to take over this area but she’s losing patience with its continued growth. Haha

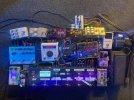
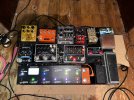
Update: here is how the board looks now!

View attachment 2843

Im starting off worse than you guys. Not even close to mounting anything because I keep starting over with the programming. Don’t even have enough room in the studio for all these pedals so moved the effort to where my solo rig is set up. The wife allowed me to take over this area but she’s losing patience with its continued growth. Haha


IMG_1340-compressed.jpeg

IMG_1341-compressed.jpeg
 
Love this! Mine is starting to get a litte more sorted now.
Mine isn't fully sorted. It was built very poorly (by a so called professional) and I am having to sort out the wiring myself. Lots of things were missed off or wired incorrectly. It is a complex rig and also runs rack gear and rack amps. I am in the process of putting together a smaller rig using a PBC 6x, which I'm going to build with a bandmate.
 

Attachments

  • Top tier.jpeg
    Top tier.jpeg
    538.2 KB · Views: 24
  • Bottom tier.jpeg
    Bottom tier.jpeg
    522.1 KB · Views: 23
My smaller board, will look something like this once it's built. I have a matching 2 button footswitch and the PBC is in a dark blue colour. The only way to get that on this pedal platform website, was to superimpose a second 6x and move that along. Looking at the Vertex Tour Compact boards with a smaller riser, but those need to be imported over here.
 

Attachments

  • Vertex TC Tour Compact with TC2 Riser.jpg
    Vertex TC Tour Compact with TC2 Riser.jpg
    163.3 KB · Views: 22
My smaller board, will look something like this once it's built. I have a matching 2 button footswitch and the PBC is in a dark blue colour. The only way to get that on this pedal platform website, was to superimpose a second 6x and move that along. Looking at the Vertex Tour Compact boards with a smaller riser, but those need to be imported over here.

Awesome boards. We have quite a few of the same pedals. You like the Simplifier DLX? I just got the MKII and it’s an incredible little beast. The DLX has more features but both the Humboldt’s are really top quality.

I’m also building 2 boards. both based on PBC’s, one 10 and one 6/x. I’m trying to stop lugging my rolling racks aroind especiallly with doing a lot of one man outdoor summer gigs this year. One rack is Helix based, the other AXE-FXII. Not getting rid of them but felt it was time for a change and I’m eager to use my tube amps more. My DIY Tweed is perfect for my summer gigs. Just built it and it’s a great little amp.
Thanks. I'm somewhat of a gear head, not helped by previously (many years back now), owning my own music store. I play over 10 instruments, so add that to the GAS sickness many musicians have and you get the idea. My office is crammed with 14 synths and a part drum kit plus studio gear.

My bandmate (also plays over 10 instruments) and she's been through a Kemper, then a Quad Cortex. She's just picked up the Amplitude pedal, but I haven't heard how that's sounding as yet. Small rigs are more attractive as you get older ):

She's also going for one of the Morningstar controllers as you have, especially as that's also her surname.

Simplifier DLX is pretty cool, but there's a fair bit of noise from the pedal, especially when you have a gained out amp setting. That's why I'm going to use a Sentry gate. I have 2 already in the back of the 2 rack amps I'm using, but the big board has a dedicated volume pedal, so I can get away without a gate, when using the Iridium DI.

I wanted something that was non midi for the small board and the DLX ticked all the boxes. I just need a clean and crunch sound, which can be boosted. On the bigger rig, I can have a different sound per preset from the 2 rack amps as those are also midi (Triaxis and JMP-1).

Best way to handle the wife is to keep things out of site, but in full view. I had a cupboard built over the stairwell, where I keep most of my guitars. So these are in their cases, in full view, but she never looks inside the cases. It works well for me haha
 
I don’t crank the gain on the DLX. It is noisy but the noise floor is much better on the MKII.

i got the Morningstar on a whim. It’s easier to program compared to the PBC‘s but it’s not as robust and I’m not buying their switcher. I might or might not end up incorporating it somewhere, we’ll see. A WIDI Jack came with the MC-6 and I’ve been experimenting with it. I was so impressed I ended up buying a bunch of CME-PRO WIDI stuff and I’ve already incorporated it into my Alesis SR-18, BOSS RC-500 and a MIDI Captain controller cutting down a lot of wiring for my summer rig. Very dependable so far, I gigged with the setup 3 nights last week for the first tme and no snafus. Still bringing cables just in case but they allow me too put stuff where I want vs where they must go based on cabling.
 
I hear great things about Morningstar, but their gear doesn't come with having Ron available to help you to set up the gear the way you want to use it.
His help has been invaluable and I would not go elsewhere. That was one of the main factors in going for the 6x & I am very happy with this controller.
I also get the reliability, which is why most of the big names use RJM gear.
Not yet delved into WIDI but am keeping am open mind.
I also don't crank the gain that much as I can always add in more from the pedals. I use a lot of clean sounds as I'm mainly playing jazz- rock / fusion when it's my own band but I do get drafted into other bands here and there, where I have to play their material, which can be pretty much anything. Flexibility is the key with any gear.
 
For sure man, I’d never go 100% Morningstar because you’re right, Ron’s personal support is invaluable plus the PBC’s are much better with superior quality. A few months ago I wasn’t using MIDI much now I’ve got 4 MIDI controllers…LOL. As an added bonus I never paid much attention to the MIDI capabilities of my big rig amp (REVV MKIII) now I’ve got complete control of the parameters and it blows away the foot switch that came with it. MIDI is awesome!
 
Defiantly. I think RJM make the best gear and have the best customer service with it. I would not go elsewhere.
Midi is so useful when you get your head around using it. I have had a midi rig since 1990 and have got used to one button being able to change everything.
That's how I tend to set up things, so I can concentrate on what I'm playing, rather than what has to be turned on of off.
On my main board, I have around 12 midi enabled pedals, rack effects and rack amps and a single button can change everything.
I'm also contemplating the Midi kit for the POG2, so that's one less thing I have to concentrate on, especially where I am using more than one of the saved presets in the same song.
Fortunately, Ron's switchers can cope with a lot of Midi and there's still enough channels to add on one more thing.
I could chain the 6x from the 10 if I ever needed to. In some ways, with hindsight, I should have made a smaller main board, with just the core pedals I use all the time and then, a satellite board, to add on the rest if needed. Lol
 
Update: here is how the board looks now!

View attachment 2843
This looks nice :) I also have the PBC10 and among other things the Freqout. It is just a shame that you alway have to activate it manually and after years of using it I am still struggling what might be the best setting. I think the third harmonic setting is used by a lot of people, but at the end of the day I prefer the first harmonic setting. I have struggled with a lot of feedback emulations. I have never found something which just sounds right. Recently I got myself an Ebow. I always thought an Ebow is just a gimmick, but this produces to my ears by far the nicest feedback sound I have ever heard. It just immediately sounds right. Even in the standard settings which is theoretically without harmonics the harmonics come when you put some distortion after it. So that's my favorite setting. So my dream feedback emulation would be a pedal which produces exactly this beautiful sound. The icing on the cake would be the possibility to recall presets via MIDI and Expression Pedal input. I don't know the Ebow has immediately this magic sound quality, maybe I am still using the Freqout in a wrong way, although I have to admit that the ability to also have the Feedback Effect on chords is a great thing. Think for example of Zoot Allures by Frank Zappa. You can recreate that with the Freqout in the third harmonic setting and it doesn't sound bad at all, but as I said generally the Ebow sounds so much nicer, but it takes time to change between the pick and the Ebow so a Pedal is way more practical.
 
Mine isn't fully sorted. It was built very poorly (by a so called professional) and I am having to sort out the wiring myself. Lots of things were missed off or wired incorrectly. It is a complex rig and also runs rack gear and rack amps. I am in the process of putting together a smaller rig using a PBC 6x, which I'm going to build with a bandmate.
Nice board. :) Where did you get that 4-button box that nicely matches the profile of the PBC? And what do the buttons do (cuz I thought you can only add 2 extra external buttons to a PBC)?
 
Just got myself a second hand PBC10 after years of dreaming and planning. Couldn't wait/afford the parts for the cables I'll build to set it up properly, but also couldn't wait to try out my new toy...

I'm curious, has anyone else with a PBC10 created a Frankenstein rig out of whatever cables they can lay their hands on just to start making glorious noise as soon as possible?

View attachment 2297

Pedals in loops of the PBC10 are inside the yellow box (NOT including the Keeley Super Phat Mod, Tuner or volume pedal. The main area of chaos is the "pile of drives". Here is another angle...

View attachment 2298

Signal flow is as follows:
Guitar into PBC10
Loop 1: POG2
Loop 2: Xotic SP Compressor
Loop 3: Decibelics Golden Horse
Loop 4: Analogman Prince of Tone
Loop 5: Lovepedal Eternity Kanji
Loop 6: Mesa Throttle Box
Out 5-6: to Kingsley Squire Preamp
In 7-10: from Kingsley Squire Preamp
Loop 7: Strymon DIG (stereo, parallel)
Loop 8: Strymon BigSky (stereo, parallel)
Loop 9: Strymon Timeline (stereo, parallel)
Loop 10: Neunaber Illumine (stereo, parallel)
Out L/R: to GFI Cabzeus

PBC is sending MIDI to Selah Quartz timer, Timeline, BigSky and Illumine
Selah Quartz is sending tempo info to the Timeline and DIG.

I'm currently testing this in my studio straight into my DAW (Reason or Ableton Live) using studio monitors or IEM. It may be a mess, but it sounds awesome.

Currently doing A/B tests between the Squire/Cabzeus pairing and a DSM Humboldt Simplifier (which can be seen in the top of the first pic) to try and work out which I like better.

It is currently setup on a Pedaltrain Pro board, but that is only a temporary solution as it won't be large enough for what I'm planning in the long run. My initial plan for the PT-Pro is below (mocked up in SketchUp).
View attachment 2299
This plan quickly unraveled for the following reasons:
1. I didn't have plugs and cables to build everything "properly", only a varied assortment of patch leads The length of these patch leads led to the "Pile of Drives" and also the rearrangement of the Illumine and Timeline.
2. The Supro Trem was in loop 7 but I didn't have the correct cables to put a mono input/output pedal into a stereo loop, and it did NOT cope with the high output of the Squire preamp.
3. After hearing how awesome the Illumine and Timeline were in parallel, I decided I simply must find out how good a BigSky and DIG sound in parallel. At the same time as the Timeline and Illumine. So the trem and dimension had to make way. And it sounds GLORIOUS.
4. I swapped out the Octopus analog octave for the POG2, and was reminded how good it sounded.

I do have to give a big plus to the Neunaber Illumine, as it has TRS input and output! So I could use some TRS patch leads I had lying around for that pedal, didn't need an insert cable. Very impressed, hope it gets added to the device list soon!

So where to from here? I've ordered a dual external footswitch for page up/down duties, which will go between the PBC and the Quartz. I'm also getting six patch leads so I'll be able to hopefully get the pile of drives into some semblance of order. Or at least three pedals. I'm hoping I can get it at least a little neater so I feel I can take it out in public without people recoiling in horror.

I'm planning to swap the DIG for a Free the Tone Future Factory. If the DIG had MIDI and presets, it would stay, but alas it does not. I'm also planning on modding the POG2 for MIDI. I will probably consider a GFI Synesthesia to handle modulation duties in Loop 6 and bump the Golden Horse to always on buffer (which I have been using it for). And maybe a MIDI controlled drive...
Not only is this how I set it up, I start off on a table instead of the floor so I can quickly swap devices and order using longer cables. Mounting and tidiness definitely comes last!!
 
I think your approach is completely reasonable. Start with the logical flow of the signal and control, then do the pedal tetris to make it fit together. Here's a few tips that I use when building and configuring pedalboards for customers:
(1) Lay out everything on a large work surface such as a table. If it's a table you care about, be sure to protect the surface with a sheet of cardboard or a couple of layers of butcher paper. Aside from potential surface scratches remember this: effect pedals typically live on stages, where they are in direct contact with filthy disgusting things such as myself and other musicians. Start by individually cleaning and testing EVERY device, including the power supply. Make sure it's working correctly before you do anything else.
(2) Consider how the user will interact with the board. What pedals / controls need to be accessed directly? For instance, one of the layouts shown here has a Freqout pedal (which I love!), and that device always powers up in bypass mode and can't be remotely activated; so even if it's in a loop, the user will need to activate it every time the board it powered up.
(3) Before you start to lay out the pedals, consider the size of the board. If you will be using a known pedalboard (e.g., Pedaltrain Pro), take some blue painter's tape and create a rectangle of that size on your (hopefully protected) work surface. I do this with the INSIDE edge of the tape marking the OUTSIDE edge of the board, which means nothing in the layout should obscure the blue outline.
(4) Plan in advance how you'll be wiring the board. My recommendation is that you make all of you own cables if possible - even if they're George L or some other solderless variety (MIDI and other multipin cables are progressively more difficult to solder, but it can be done). No matter what, have some DC power, 1/4" and MIDI cables handy when you start to test-fit things, to ensure you are leaving enough space between devices for your connectors.
(5) Experiment with the initial layout, prioritizing devices that the user needs to access onstage. This are things like the loop switcher, expression pedals, tuner pedal, etc.
(6) Next, place devices that need to be visible or accessible when necessary. These may be things that have displays or knobs that will adjusted between songs / sets.
(7) Everything else falls into the "put it where it fits" category. This is where you should be thinking about the third dimension... some pedals might go under the board, or under a riser platform. It's important to be able to access anything that could be adjusted. Stuff I put under boards is usually anything without a knob: buffer, power supply, splitter, etc. For everything else, I make sure the full face of the pedal can be accessed with minimal effort. A hinged platform is a big help in this regard, and most pedalboard cases give you enough room to accommodate this.
(8) Now it's time to wire stuff. My preference is to wire power, then MIDI / control, then finally audio in that order. This is because most of the time, that is also the order of increasing cable size, and routing the audio last will make eventual troubleshooting easier. Test EVERY cable before you install it - whether the cable is brand new or one you made yourself. If you don't have a cable multi-tester, this is great time to buy one. Trust me on this one; it will save you a lot of frustration on a complex build. Once power is routed, tie those cables down and clean up their routing to the supply. Do the same thing for MIDI / control. Finally, do the audio. No matter whether you have built / bought the power and other cables, this is the stage where you really should make your own. I really like George L cables for their ease of use and convenience, but for a little extra durability and peace of mind, I prefer to solder cables. Make each cable the correct length for its place on the board, and label each end of every cable indicating its function based on signal flow (e.g., a cable going from the output of device A to the input of device B would be labeled "DEVICE A OUTPUT" on both ends). Keep the routing NEAT NEAT NEAT. I like to be able to visually trace every cable from end to end, but that may not always be possible depending on the complexity of the layout. If anything is going under a hinged platform, the cable routing for stuff ON the upper platform should all be from the hinge side, neatly bundled, with a bit of slack. Pro tip: this will be the first place to look when you eventually troubleshoot the board, since ever time you flex a cable, it slightly damages it. Can't be helped, so just do it neatly.
(9) Before you spend a bunch of time carefully adding zip ties everywhere, start by testing for all functionality. The pedalboard universe is littered with zip ties that were cut off mere moments after being installed :) Give the board a good workout to ensure that it is completely ready to rock. Then bust out those zip ties.

A few other considerations:
(A) I always build a small patch panel for every pedalboard that contains Neutrik PowerCon IN, and signal IN / OUT. The PowerCon connection is super important. Those plugs are nearly indestructible, are easily field serviced, and they lock in place. You don't want someone accidentally unplugging a standard IEM cable during a gig. The signal IN / OUT connections simplify connection to the instrument and amp. On some boards, customers need MIDI or USB connection jacks, and they're also easy to add (search for "D" Panel connectors).
(B) You probably have an unused 9v output on your pedalboard power supply. Consider adding a strip of self-adhesive LEDs along the underside of the front edge (the edge closest to the musician). This gives the user a clear indication of where the edges of the board are, and it does look kind of cool too.
 
Mine start with generally what I'd like on it. Then, I poke about with the layout til I can get it vaguely the beginnings of what I want (so a bit of a messy pile, but probably not necessarily everything at once). So it looks just as messy and I can explore some sounds, swap in and out a few pedals, etc. Then, since I get custom boards built, I then look at their designs, try to work out my design to their general shape, with dimensions I want. I use some vector drawing app to then make a scale plan. I use "layers" in the drawing app to have the board design on 1 or 2 layers, and the pedal oblongs on another layer. Then there's a bit of back and forth between me shuffling pedals on a plank of wood and dragging the "pedals" around in the scale drawing. When I think it's pretty close I then knock up a prototype with some old bits of wood - the base rectangle and a shelf of what I think are the right dimensions. Any other risers can be just blocks of wood/small boxes, or whatever. Then I actually put pedals on it, shuffle them around, make sure they fit. I put a few little bits of velcro on the prototype board so pedals stay in place, but not waste too much since it's a prototype. Then get stuff actually working properly and do controller programming. Sort out wiring - long at first, and power (there's at least one spreadsheet at this point for current/PSU outputs/etc and midi connections with likely pedal order).

It's then looking like a board, fully works, but totally impractical to take to a gig or practice. But I can just play it as if it's final for a few weeks and tweak the usability, fiddle with controller changes, swap pedal order, swap pedals in and out, work out what I accidentally hit with my feet I shouldn't, what I want nearer for easiest access, etc. This can show me I can shrink the board, or need it bigger, or shelves are to wide/narrow, if things are too far apart, I don't like the usability of where buttons or tap tempo are, etc, etc, and the most important thing: what dimensions I should tweak in the design before spending lots of money on a custom board that may be the wrong size or shape and will annoy me for years. I'll tweak my scale drawings at this point based on any changed. I may make some cables the correct final length at this point, but may leave a lot of them if I'm unsure. Then I get the board ordered - obvs I can send them my diagram with exact dimensions in my tried and tested scale drawing.

I'm currently at that point. My new board is ordered. Hopefully coming tomorrow so I can work on it over the weekend (but may be next week). As soon as it turns up I can then do any mods to the board (sometimes cut a hole and put an IEC mains thing, output jacks, and/or MIDI port in, or rivet cable clips to it depending on my design. Then is just a case of swap everythign onto that. I already know exactly where everything is going at this point, so I can just swap the lot over, put in final neat wiring, and I know it all works, is as useable as possible.

So I have no pics of my messiest stage (and some of that was done on a bigger old board just to work out pedal order). The prototype I ended up with is this (gave it a squirt of black paint too before putting pedals on)...

IMG_0177.JPEG
IMG_0178.JPEG

And I have diagram based of the above, but with "better bits" as the final will have...
PBC Pedalboard v2.7 (dimension fiddle).jpg


That's probably a slow and convoluted way, but I'll be damned if I'm gonna spend £850-900 on a custom board that doesn't fit my needs, when I can use some bits of wood I have or can scrounge and a few extra quid for a couple of hinges or squirt of paint and daily drive the cheap-ass version for a bit. And definitely no way I'd give a big pile of cash to a pedalboard builder and just tell them to make and program it, as I might not like how it is, and then can't change something, and a lot of that depends on how I'm using it in songs or jams.
 
Back
Top